Wednesday, August 14, 2013

Baby quilt

I cut the panel for this apart and cut away all of the black between the motifs and repositioned the pieces. I didn't want to make a quilt by putting borders around the whole panel which would have  made it rather long and narrow. This is 36 x 40 and I think that this is about the size we decided on for our quilt closet baby quilts. I wonder if repositioning the pieces has made it look more like a wall hanging.
I decided that I would use some black background fabric for the inner border and the binding. I bought this another time for something else and noticed it is from the same line.
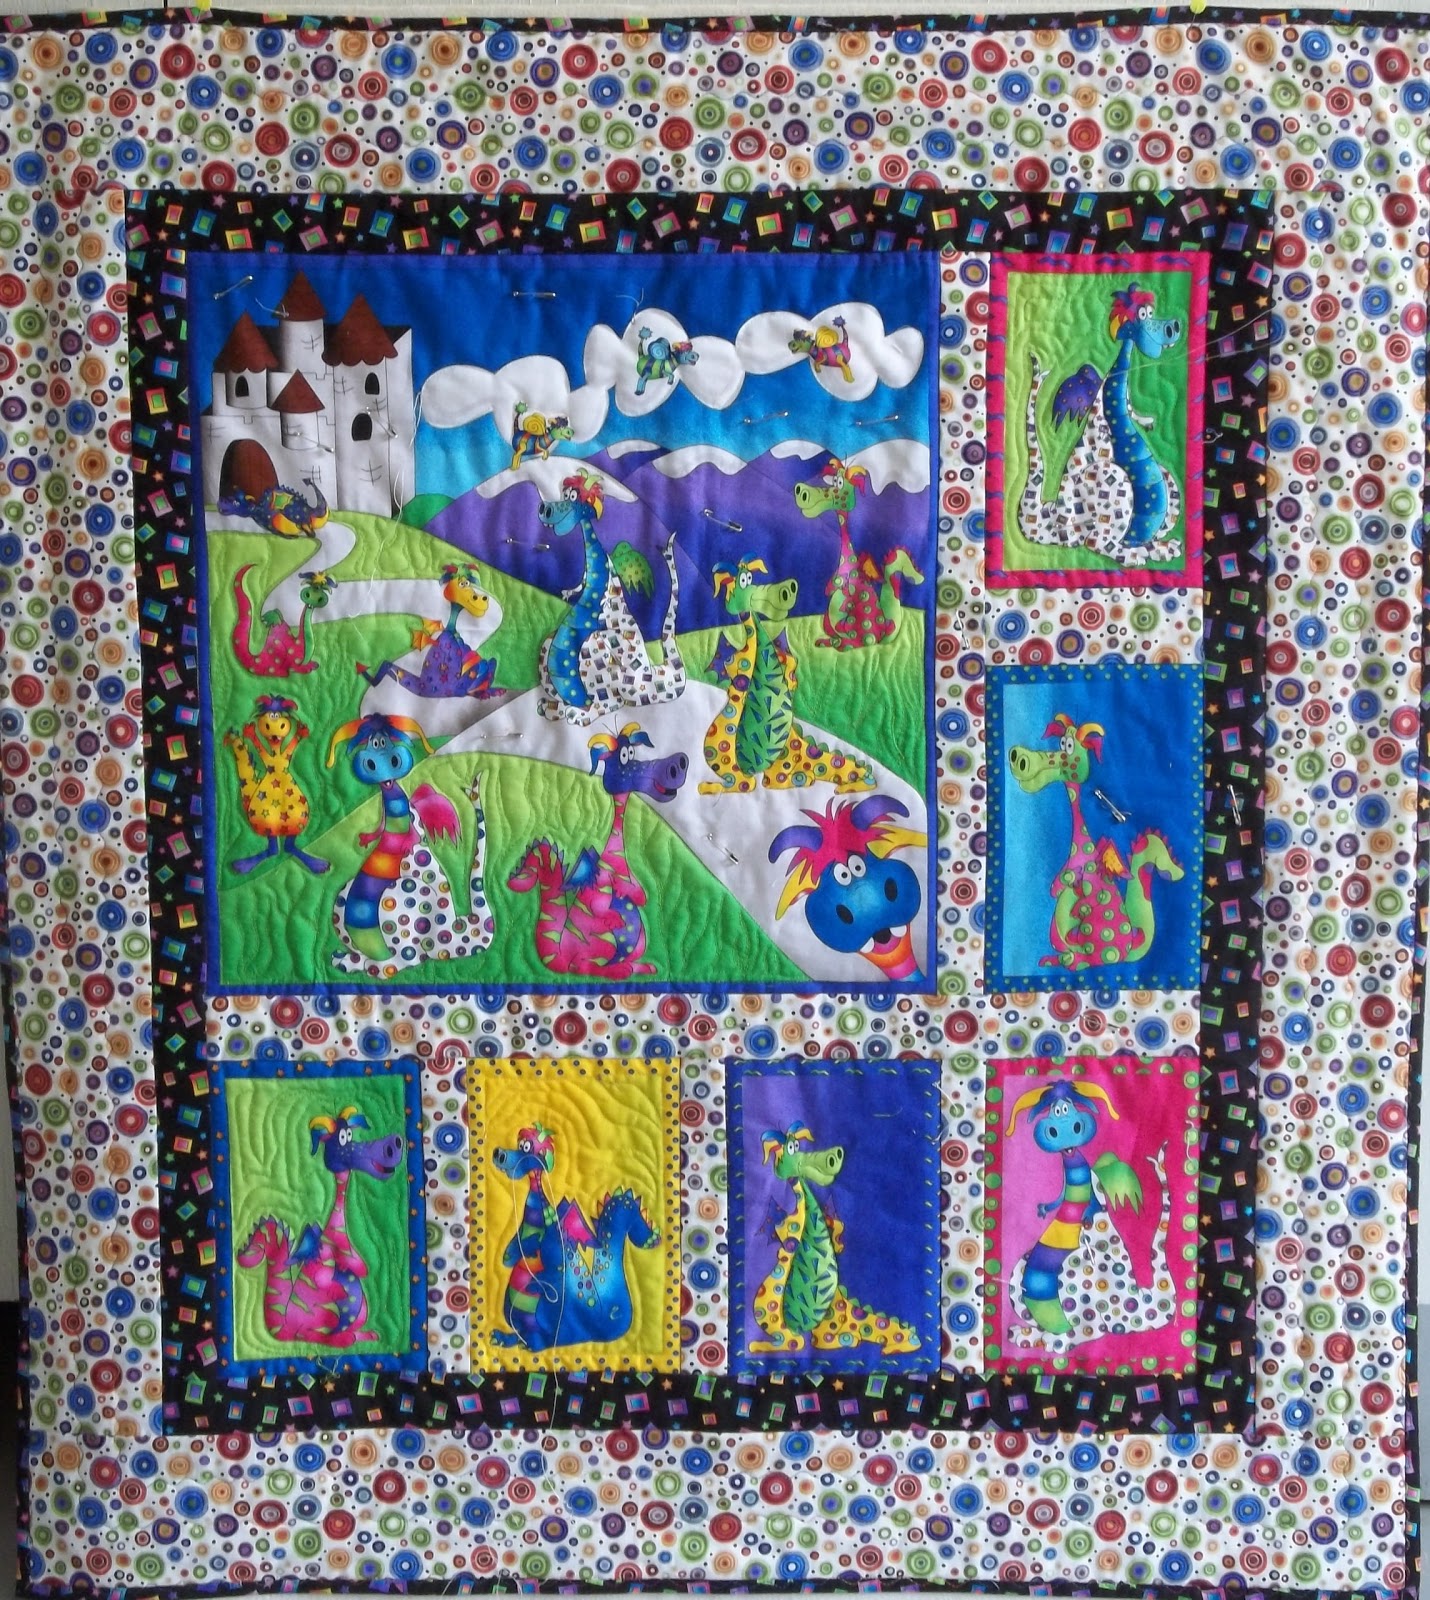
I am not finished with the quilting on this baby quilt and I am sorry that I didn't just quilt it with all  over straight or wavy lines. I don't care much for the look of meander quilting or and all over loopy patterns on a panel like this but maybe that would have been a better choice. It is slow going and there is much changing of thread colors. I am also at a loss about how to quilt the purple mountains and the path and the blue sky. I did echo quilting around the dinosaurs in the rectangles and something to resemble grass in the green areas in the bigger section. I am probably making a big  deal  over nothing; babies don't really care if all of the quilting is absolutely right for the quilt.

I am pleased with the 80/20 batting as it has not made the more densely quilted areas stiff. I will still use Warm and Natural for all my wall  hangings but I really like the 80/20 for bed quilts and baby quilts. I will be using it in the hand dyed 16 patch quilt, the backing has been washed and I am ready to layer it up.  It will not be a wall hanging or a bed quilt.
Maybe it will be a table cloth.
Maybe it will be a Birthday Party table cloth.
Maybe it will hang in my sewing room closet.

Friday, August 9, 2013

Checkerboard Flimsy

The borders are on and I can layer this up and quilt it. Or..... since I no plans at all for this, I can leave it up on my design wall for a while until I need to use the wall. It is nice and cheerful and I like looking at it.
I follow Wanda Hansen's blog Exuberant Color; she has been making 16 patch checkerboard quilts. They all look wonderful.  I didn't have a plan when I started this I just made strip sets and I was thinking 4 patches to start. I didn't consciously make a decision to copy her blocks but I can see it definitely influenced me. I was admiring all of her 16 patch garden quilts this morning and it dawned on me. Sometimes we know exactly where an idea  came from and sometimes we never know but I believe it always comes from something we've seen or heard. What we do with that spark of inspiration  may turn out completely different or maybe not so much. I am thankful for all of the inspiration from all the creative people where ever I find it.

It is 52 inches square and when I am looking at it on the wall it appears more cohesive than in the photo. I wonder why that is. I would think that in the photo, which is smaller one would be looking at the whole thing but when looking at the quilt on the wall the eyes would be moving around and seeing smaller areas. Hmmm, I believe that is the answer.
I put all the 2 inch strips and uncut pieces of hand dyed fabric in a bag and I don't know if I will keep it (for another 20 years, maybe). While I decide it can stay, it really doesn't take up much room. I think I am hopeless.

I have to make a baby quilt next and it has to be a fast one as there are 6 babies due soon from our church congregation and we only have 2 quilts in the closet. However I don't have to make more than one quilt.

 I found these 2 fabrics Wednesday at one of the quilt shop stops.
I am thinking of cutting away all the black and repositioning the smaller dinosaurs  as I don't really like the shape it would be if I just bordered it.  This is probably not going to go as fast as I thought it would, after all.


Next up after this is a T shirt quilt. I've had the shirts for a long time and I finally bought the interfacing a couple of weeks ago, only to find I already bought it the last time it was on sale. Oh well, it won't go to waste and it doesn't take up much space either.

Thursday, August 8, 2013

Checkerboard Progress and an old biker's birthday.

I have been making progress on my hand dyed checkerboard quilt dong it "15 minutes of play". I usually work for longer periods but for the last few days it has been in short bursts. I am amazed at how much I get done that way. I was going to stop at a 6 x 6 block setting but I decided to make as many blocks as I could to use up all the yellow and orange strips.

This picture shows the body to the top sewed together and the border fabric auditioning at the left. I stopped at 2 quilt shops yesterday (on the way home from jack's follow up visit after his Tuesday cataract surgery) and did not find what I was looking for to use for border. I had this Kaffe fabric and it looks pretty good so I cut it this afternoon. I have a lot of purple and blue strips and a bit less of the reddish strips and I considered piecing a piano key border but decided not to as I didn't have anymore yellow or light orange or peachy strips. One thing I am not going to do is obtain more!!! I like this now that it is together but not enough to want to work with these fabrics again.

Jack's cataract surgery went well and he is happy with the results. today is his birthday and he decided that it was only right that he should get out for a short ride on his motorcycle for his 81st birthday. He is slowing down a bit and doesn't take the long rides that he used to; when he used to leave in the morning and meet up with another old man and they would ride all day. He didn't start riding until he was 52 ( we almost got a divorce when he came home with his first bike). He used to  say he would ride till he was 65, then till  he was 70. When he was 69 he rode from NEO down to the Smokey Mts. to meet up with some on line friends and he rode the Dragon at Deals Gap.

I think this pic of Jack in the red jacket is from the 2nd year he went down to the Smokies. The label on the photo says Rain Ride. 
 The next year he went to Americade motorcycle event at Lake George and down to the Smokies again. This second photo is another year and the one in the red jacket with Jack is our son John.
 It has been 11 years since he has gone that far but he rides most days during decent weather and in the winter if the temp is above 30 and the streets are clear he might get out for a ride. Here is a link to Jack's hero. I hope Jack lasts till he is this old but I am sure his bike will not. BTW I never ride with him and never wanted to. He is a good safe rider and the only accident he ever had was when he got rear ended by a kid in a pickup truck at a stop sign.
I'm glad I didn't divorce him
when he showed up with that first bike.

Monday, August 5, 2013

A few more hand dyed checkerboard blocks etc

I am up to 30 blocks and I think I will make about 8 more blocks for a total of 36. I  am going to replace 2 blocks that I don't like. I m removing the 3rd and down in the center vertical row 5th blocks. I believe the green and orange fabrics are both commercial solids and they just seem to look out of place; the dark purple and mottled pink seems too dark overall. I made this decision after Jack came in my sewing room to talk to me and I asked him what he thought, not mentioning that there was something bothering me. He didn't hesitate at all in telling me that he thought those 2 blocks looked out of place. I don't always think too much of his color sense but when I ask his opinion he usually comes up with a good suggestion. I think it is because he doesn't get hung up on the color so much as value and balance. If he zeros in on the thing that is bothering me his opinion usually carries some weight.

When I started making these blocks I didn't have any sort of plan at all so I didn't pay attention to pressing the seams other than to press to the dark. I usually have a pressing plan so I have opposing seams through out if at all possible. About halfway along I gave it some thought and my blocks from then on all have opposing seams and I will just deal  with the rest of them as I put the blocks together. I am making some notes to myself so I will make future blocks in the same way  as it really is quite simple. If I make all the blocks the same all  I have to do is turn alternate blocks 180 degrees and the seams nest together.

This is not going very fast because I wasn't all that into it in the beginning and then when I started getting more enthusiastic about it there were distractions.  Jack wanted to go to Walmart for something and I tagged along just to take a break  and get out. While he was looking for what he wanted I wandered down to the kitchen gadgets and then had a look at the microwaves. I have been looking at them from time to time because it is so difficult to get the turntable back in place after I wash it. When Jack found what he wanted he found me and had a look too. We found one that we liked and when they didn't have it in white we went down the street and got one at Home Depot. After we got it home I spent the rest of the day in my kitchen.
Our microwave has to sit on top of the refrigerator because there is no counter space in my kitchen except 26 inches on either side of my sink. (That is why has been so difficult to put the turntable back after I clean it.) In order to get at the plug we had to pull the refrigerator out. Well!!! the floor sure was dirty underneath so I cleaned that and then I moved the stove and cleaned under that and washed the sides of the stove and refrigerator that are not usually accessible. After cleaning the floor under the stove and refrigerator the rest of the floor looked really bad so I washed the floor. Before we put the new microwave up on the refrigerator I had to clean the top and, oh yes, I had to vacuum the coils on the back of the refrigerator. After we got everything back in place I cleaned the old microwave inside and out (it looks almost new). After cleaning the microwave and  cleaning up the counter top I decided that since everything else was so clean I would take the glass jars down from the shelf over the sink and wash the outsides and clean up the shelf.
This sounds like the long story 
"If You give a Mouse a Cookie".
A chunk of time tomorrow and Wednesday will be taken up with Jack's cataract surgery and the follow up visit the next day. Maybe by the end of the week I will have my checkerboard blocks sewed together and I can get out to the quilt shop to find something for the border that will pull all those colors together.

Friday, August 2, 2013

So So

I have been stitching up some checkerboard blocks with my old hand dyed fabric strips and while I don't hate them they are really just "so so". I really do prefer printed fabric to solid. About half of the fabrics are mottled and the other half is pretty much uniform and I think I would like it better if they were all mottled.

When I cut the strips I was thinking 2 inch squares and I cut the strips 2 inches wide. I went along thinking 8 inch blocks and when I got the first few sewed together I could see they were not 8 1/2 inches but 6 1/2 inch. Don't ask me why I  did that. Any question that begins with "why did you" is an unacceptable question and any question I can't answer makes me crabby.


I remember I did this once before when I made a queen size quilt for my daughter and cut my strips 1 1/2 inches instead of 2 inches and ended up with 3 inch instead of 4 1/2 inch 9 patch blocks. I had to make a lot more blocks than I had intended. I do not intend to make a lot more blocks than I  intended this time. As a matter of fact, I have no specific intentions for these blocks but I will make a few more before I move on to something else.

I think there is something wrong with me that I can't just throw these strips away or put them in the dog bed bag. when I thought they were gone I was perfectly content with that but when they turned up again in my closet I started thinking I should do something with them. I would not have the courage to pass them along as a prize in the next annual Jellyroll Race.  I might get banned from the Basement Divas.

Thursday, August 1, 2013

Fabric Rescue

I had a box of hand dyed fabric from 2 guild workshops about 20+ years ago. Once or twice I snipped off some pieces for hand applique but most of the fabric was still intact.  I put it in a bag to throw away because when I put it in the sink and ran hot water on it the color continued to run the whole time the water was running. I thought it was gone but it was just hiding in the closet among some other items in bags. When I found it I looked at it again and I remembered that after the workshop I bought it home and washed it all together  in hot water and it all came out looking no different than before I washed it.  So I washed it again for good measure and decided to keep it. None of the colors were deposited on any of the other fabrics the mottled appearance was done purposely as we were experimenting.

 I did not put it back in a bag or a box. I cut it all into 2 inch strips and I am going to sew pairs together and see where it goes. There were 40 some pieces of fabric many half yards and some fat quarters and a few smaller pieces. I guess I must have used some of it at some time after all.

So here are all the strips arranged ( big surprise) kind of by color on 4 trays.


I don't really have a plan and I do not expect to make a masterpiece or a "knock your socks off" quilt. I like most of the mottled colors and I like the way the fabric feels. It is soft and smooth and has a nice weight. I know I bought bleached white muslin at Joann's for the workshop and I believe the quality of the fabric is better than the muslin I see now in the store. I will probably have fun working with the colors combinations. Anyway, what have I got to lose? I thought I threw the bag of fabric away and if I don't like what is happening with it I can just put it in the "dog bed" bag. I am not afraid anymore that it will dye the dogs rainbow colors if it gets wet. I am not working on anything else right now so this will keep me occupied while some ideas I  have for another project are rolling around in my mind. I find that if I am working on something while I am thinking about a project or a problem I am more likely to come up with something I want to do. It will be a break from knitting dishcloths while I think.


Sunday, July 28, 2013

What do you do when you are bored?

Believe it or not, I clean when I'm bored which is probably why my housekeeping is sporadic. I am seldom really bored but today the only thing  I really wanted to do was make buttonholes for a shirt I just made. In spite of having recently sorted and put in order a large shoe box full of  buttons I did not have enough of any one kind of white buttons. I am not driving right now so I had to wait for Jack who was out on his bike.
So, I cleaned my sewing  machine. First I cleaned the inside and it was really linty. Then I cleaned the outside; first I dusted it, then I noticed that there were ink marks from holding my Pigma pen while I was doing something around my machine, then I noticed that the spool holders were all gunked up with the adhesive from the thread spools and they were all dirty looking from the black ink on the labels. I used some Mr. Clean to get that all off. Well then, my sewing table didn't look so red hot either. It is showing it's age but it is still solid and it is the right size for my space so I cleaned it up.

I had clear package tape covering lines I drew as guides for making HST's without marking diagonal lines on squares. I removed the tape that was getting ratty looking and cleaned off the sticky residue and drew new darker lines and covered them again with clean tape.
I also cleaned all the thread from my pincushions and from the attached bag for all the extra shreds and threads. Those sand filled  pincushions with the little bags attached don't stay put on my sewing table so I tape it down with masking tape. I removed the old blue painters tape and cut 2 neat strips of light tan tape, much better!
By the time I got all that done Jack came back from his ride and we went to Joann's for buttons and I took advantage of my 70% off entire notions wall coupon. This is what I got for $13.88

Buttons are not considered notions; even though they are in the same aisle with all the other notions with a big sign (hanging right over the buttons ) that says sewing notions. Never mind, I needed the buttons and they are really inexpensive for what I wanted. In fact, after I picked out 2 cards that I wanted I found another bag of 130 buttons and they were so cheap inexpensive that I bought them as well.
I could do a little more cleaning
but I am no longer bored
so it will have to wait for another time.


Tuesday, July 23, 2013

Ugly

I was rummaging through my fabrics yesterday and came across some fabric that I really don't like. It is a fairly recent purchase and I can't understand why I bought it. There is nothing about it that I like. There it was taking up space and I thought that it would make a good useful grocery shopping bag. I took one of my plastic grocery bags and cut the bottom and the handles to flatten it out and made a pattern. I decided to use some bias binding on the cut edges to make it sturdier and perhaps make it better looking.

Well ugly is still ugly. Jack thought it was too small so I decided to make another ugly bag and found a similar larger pattern on line.
I would not be seen carrying these bags but as we usually bag our stuff by the car it will be OK. Jack can carry them in when we get home. I will use the better looking bags I made a few years ago when we were snowed in for a few days.


Recently, while I was decluttering and we were improving my sewing space, Jack installed an under cabinet light on the bottom of the shelf over my cutting area. Lighting has always been an issue in my sewing room. There is no overhead lighting and lamps take up valuable space and always seem to be in the wrong place and need to be moved around.
I  took these two photos without the flash and they show a difference but in real life light the difference is much more pronounced. It even lights up the stitching area on my machine when I am set up for quilting.

I was so pleased with the light I rewarded Jack by sewing some missing buttons on his clothes. That brings up another subject. When I got out my button box and dumped all the loose buttons (on my new counter under the new light) I decided I really needed to organize my buttons; that is what I spent the day doing yesterday. I bagged all the carded buttons and strung together all the buttons that where alike and put assorted buttons by size, small, medium and large in zip lock bags and did the same with all the assorted light and dark shirt buttons. I'll see how well this works next time I need to sew on a button. No photos of this; the only thing more boring than ugly  bags is a boring box of bagged buttons. How's that for alliteration.

Friday, July 19, 2013

2 Finishes


 I was almost finished with this the other day but I was contemplating what to do with the hexagons. I decided to quilt across them in 2 directions. Here is a picture showing the quilting. It is enough! My previous post shows the whole  table topper.


I got the 2013 Diva Jellyroll Race quilt layered up last Saturday and I  finished it up yesterday with Kona Bone for the binding.


On the right is a  close up showing the wavy line grid quilting. Quilting across was  easy; I just stayed between the seam lines. Length wise, I had to mark lines 2 inches apart to stay between. I knew I would end up with my seams drifting off to one side as I went along.  I started with masking tape which didn't work  too well. then I tried my old pizza cutter/pseudo Hera marker and it didn't show up very well. I think it works better with Warm and Natural batting. I went out and bought a Sewline mechanical pencil and ended up not using that for this either. I just marked with blackboard chalk in the end as I didn't need a fine line only guidelines to sew between.

I like the Sewline markers and I used both the white chalk mechanical pencil and the air/water erasable one, that I bought last week, to mark my straight lines through the hexagons. Maybe with my new markers I will  get back to doing some work  on MY BIG UFO.  I have not done anything with it since the day after our commitment meeting 2 months ago.


Friday, July 12, 2013

A Finish

I have a finish (maybe). Yesterday after Jack's appointment with the eye doctor we stopped at the quilt shop and I got border fabric for my Honeycomb  table topper. When we got home I layered it up and quilted it and added the binding; I machine finished the binding this morning. For the backing, I was able to use fabric leftover from piecing the backing for my Jellyroll Race quilt that I will layer up tomorrow at the group meeting at the church.

I used Kona bone for the binding it finished the edge off better than the red fabric would have. After I stitched the binding to the front I pressed it away from the border and then turned it and pressed it, shaping the corners and pressing them in place. I used a washable glue stick to hold the binding and I stitched in the ditch on the front along the binding. It turned out pretty good.
I am not sure whether to call this finished or add some quilting in the hexagons. There are three options I am considering.

1. Rows of stitching point to point across the hexagons just in one direction
going the length of the row. That would be 6 rows.

2. Rows of stitching point to point in both diagonal directions. That would be 16 rows.

3. Hand stitch a smaller hexagon  one inch from the seam in all 34 hexagons.

I already discarded the option of point to point across both the length and the diagonals and I am still considering no more quilting at all.

For all my concern about not cutting the triangles exactly right to fit the odd size of the hexagons, this squared up perfectly. Maybe I should say it hexed up perfectly. Anyway, when I fold it in half, all of the points (corners?) line up exactly.   All those bias edges can be very friendly if they are handled with reasonable care.

Tuesday, July 9, 2013

Honeycomb

I have been working on the Honeycomb pack and it is coming together slowly. It is a bit fussy and I am taking lots of breaks.

I thought that I would sew 6 rows with 6 hexagons but after looking at it for a couple of days and trying to figure out a way to have straight edges on the outside edges I realized that 5 rows, with the center row longer and the other rows shorter by one hexie at both ends of each row, would work much better and give me pointed ends to make a good table runner.

The photos on the left show how I had the hexies up on the wall when I was just looking at them and the lower one is the arrangement I am using. The top three rows are sewed together and the bottom 2 rows are still just hexies and triangles sewed together to make  diamonds.

I figured out what size to make my triangles and how to trim them without losing the dog ears. That meant that I pressed to the hexagon and trimmed then I pressed the seams open.  Pressing this way and that way is  an extra step but when I sew anything that has an angle I have better results when matching when the seams are pressed open and that extra step kept the dog ears intact which helped in matching the points.

When I match the points, I match up the dog ears so they are lined up exactly, one on top of the other (top left). I place a pin exactly where the seams will cross, checking on the back to make sure it is exactly at the seam crossing point (top center and right). The bottom left photo shows that same seam after stitching. The other bottom photo shows another area with more matching points. There are a few other places where the points are not perfect but they are good, remembering that the enemy of good is perfect; I am not going to mess around aiming for perfection.
I have to sew the last 2 rows together before I can add them and then I will have to go back to the quilt shop to get something for the borders. I am leaning toward a red, probably the floral red but I will see what is in the shop. I am not going to run all over trying to find something I have set my mind on; I am leaving the options open.

Saturday, July 6, 2013

Hexagons

I was excited about the Honeycomb pack from Moda but I am a little disappointed. The hexagons are laser cut to an odd size.


They measure 6 inches point to opposite point but  flat edge to opposite flat edge they measure a little more than 5 1/8 but not quite 5 1/4. It would not make it easy to cut a few more hexagons to match the size from my own fabric with a hexagon ruler.


Of course, I could use the template that comes in the pack to cut more hexagons. I would do it by marking the fabric around the template and cutting on the lines using a straight ruler and my rotary cutter. The template is ordinary template plastic and I would not want to shave it with my rotary cutter. This photo shows the template on the hexagon from the pack, it is sized perfectly and the patches are all cut exactly.


What I want is to cut triangles to sew to 2 opposite edges and therein is another problem. The size triangle to cut is a size that also falls between the lines. If I make it a little bit larger and trim, it fits, but I lose the dog ears that help me line up the points.


This photo shows all  the hexagons up on my wall but not in the order that I will  put them together.
I am cutting a few more from my own fabric to replace some of the very light prints and I have worked out the size triangles I need.
 This is getting to be more fussing around that I want to do if I am buying precuts.

If I were going to only sew the hexagons from the pack together with each other or another Honeycomb pack, there would be no problem. I could also use my hexagon ruler to cut each hexagon down to the next uniform size on the ruler (4 1/2 inches), so I might buy a Honeycomb pack again for the variety.  I think that a hexagon ruler and triangle ruler or maybe the "Hex and More" ruler are probably the way I would go and either buy a fat quarter pack or a Dessert roll for the variety. Maybe after I put this all together I will decide that I was expecting a problem where none existed.

We'll see!